Sunday, March 23, 2014

#sewing: case for mini Kobo

i used the same pattern for the iPad case (see below), adjusted the size, et voila! I have a sweet little pouch/case for my new mini Kobo!

The right fit - projects with awaLL
Mini Kobo Case - projects with awaLL
snug as a bug - projects with awaLL


Tuesday, March 11, 2014

#sewing: iPad travel case

i have swooned over cases on Etsy for a while... fell in love with cases at the annual One of a Kind Show in Toronto... searched for patterns on Pinterest... and now i'm finally going to venture in making one of my own - totally unique (which is what i'm looking for) and virtually low cost to me! so here we go!

Original tutorial from the OH NO rachio! blog

Materials Needed:
* fabric of your choice about 1m total (you can use one pattern for the whole case, or mix up the patterns for the inside and outside, have some fun with it!)
* cotton batting/wadding for the added protection of your iPad
* rotary cutter and cutting mat
* tape measure
* sewing machine
* thread
* pins
* pencil/pen
* embellishments - like ribbon or buttons - optional

let's sew!
#step 1: creating the cushion
fold your wadding/batting in half lengthways and place your iPad onto your doubled up wadding.
with a pencil, mark the size of your iPad on the wadding and cut off the excess so that you have one long piece (double the length of your iPad)


#step 2: cutting the fabric for outer layer
measure your iPad and measure your fabric for the outer layer to =
2x the length of your iPad +
add a 1/3 to the length for your flap +
and add 2cm on each side of the iPad to allow for your seams

#step 3: cutting the fabric for the inside lining 
the inner lining of your iPad case can be the same fabric as the outer, or different fabric, whichever you prefer.
your inner lining needs to be the same length as your iPad x2 again (but without the extra 1/3 - no need for two flaps)

#step 4: preparing to cushion
keeping the layers unfolded (i.e. not in half which would look more like a case)
layer your panels and the wadding in between -
first lay your outer fabric (top side facing down on your work surface),
then place the wadding on top
and finally lay your lining facing side up on top of the wadding

#step 5: sewing prep & sealing the cushion in 

turn about a centimetre (cm) of your lining fabric under the wadding at the top end of your case, below the flap (which will be the longer outer layer fabric leftover)
this will allow for a neat inside seam and seal your wadding in

now take the outer panel from the bottom of the case and fold about a centimetre (cm) strip, this time over both the wadding and the lining.

**do not fold the fabric yet... the next two steps need to be completed while the layers are lying flat. the two stitches below seal in the wadding and create what will be the top opening of your iPad case after folding in half**

sew along your bottom end of the case first, sealing the end shut
next repeat by sewing across the top end of your case below the flap

#step 7: make room for your iPad
now fold your layers of fabric in half, and pin each side, taking care to make sure that it's straight
place your iPad on top of your pinned case & mark it's measurements on each side at the top and the bottom
then you can stitch up each side, leaving a very small gap on the outer sides of your marks. this ensures you get a nice snug fit for your iPad - but that you don't end up making it too narrow to put the iPad in.

#step 8: cleaning up
trim neatly down the seams on each side, leaving yourself with an "overlapping flap"
trim your extra edges on your flaps and pin them
sew very close to the outer edge of your flap, ensuring that the stitching will run neatly around the very edge of your flap
trim the excess material, repeat the sewing for the top edge of the flap and trim as needed

et voila - a fun and unique iPad case made by you!

<3 awaLL

Monday, March 10, 2014

#sewing: DIY magic bags

i love love love MagicBags!
they are so convenient and comforting, after popping them in the microwave for 1-2 minutes, instant heating satisfaction! :)
but a mouse made a home in mine in the cupboard once and i have yet to replace them... until now! thank you DIY crafty folks out there - especially BevCooks blog

Materials Needed:
*note: the amount of rice and size of fabric needed are dependent on how big you plan to make the magic stress relieving bag*
* Jasmine Rice (or any rice will do... the above blogger suggested Jasmine because it smells so nice when it heats up)
* 1 single piece of fabric of choice (the oversized squares sold at Fabricland or Dollarama are great!)
* pins
* thread and needle/sewing machine
* iron & ironing board

#step 1: preparing the fabric case
unfold the fabric and iron out the creases
fold the cloth in half and inside out
fold the edges over and pin into place

#step 2: sewing time
sew across the folded edges to sew them in place
repeat along the two sides and bottom
*leave the top open to insert the rice

#step 3: minute rice
turn the bag right-side-out again
pour your rice into the bag

#step 4: closing up shop
fold the edges in at the top of the bag
pin in place
sew across the top of the bag to close it
trim excess thread

time to relax
<3 awaLL

Thursday, March 6, 2014

#crochet: learning how-to crochet

i find that sometimes when i'm crafting, i tend to have a bit of tigger syndrome... that is that i bounce around from project to project and when i am inspired by a new one i really just want to get the first one finished really quick or abandon it to start something new and exciting!!

so the current project i am abandoning is finishing a knitted headband pattern... i should probably finish it so that i can see the difference in Purl stitches throughout. in the middle of the project i realized that my pattern was not turning out exactly as the picture (and this isn't the first time this has happened, but it was the first time where the stitch-pattern/design is what made this headband unique and exciting for me. so when it wasn't turning out i got frustrated) anywho tangent aside, i realized i was not Purl stitching properly! so i hopped on good ol' YouTube, found a video and realized it was a very simple fix. so i started my "new" Purl stitch mid project and already noticed a difference. long story short - i don't have much further to go on it so i should really dedicate some of my attention to that project and finish it off.
where was i?!?
i told you, tigger syndrome = me today.

right! the purpose of this blog is this: i am venturing out of my comfort zone with knitting. i have tried a few different patterns that i like and now i would like to do more! when i search for cool patterns for toques, mittens, socks/slippers, etc. i find that a lot of them are crochet patterns - so i'm going to learn!

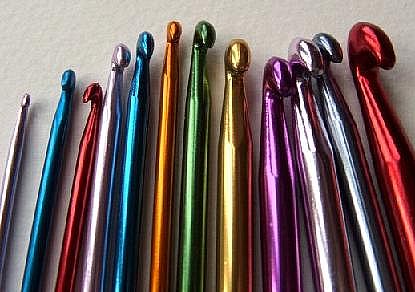
once again thank you YouTube - i have the crochet hooks, i have an abundance of yarn to play with, and i'm ready to learn. (for those who might be visual learners, this is the video i used to become familiar with the steps below)

here's what i'm learning so far...
Chain Crochet stitch
*start with a slip knot onto the hook, unlike in knitting - pull tight once your knot is on the hook
*on left hand (while holding the hook with my right) weave the yarn over your pinky finger, under the two middle fingers and over the index finger again
* hold the knot on the hook with your thumb & middle finger (on your left hand), always hold onto the knot while crocheting to keep it tight on the hook
* your right hand will control the mobility of the hook
* make the hook go down in front of the yarn and around the back of the yarn, hook the yarn and pull through the loop/knot
* repeat and you've got a chain crochet stitch

Single Crochet - most basic stitch in crochet and builds off the chain crochet
SCs pick up the top loops in a chain stitch - the top loop runs along the top of the chain stitch
each SC will be a two-step process in which you, 
* pick up the second top loop in the line by putting the hook through the top loop, YO (yarn under in front and around in the back), hook and pull through the top of chain stitch
* YO and pull through both loops on hook
* repeat & keep on working across the chain stitch
* after you finish each full row of SC you will do one CH

to start a new row, finish your CH and turn over clockwise so you are always turning from right to left. and another difference in this new row is that you're going to hook through the top and bottom loop on each new stitch (rather than the one, top loop as before).

crochet "lingo" in patterns: 
so many colourful hooks to enjoy!
CO - cast on
CH - chain stitch
YO - yarn over
YRH - yarn over around hook
DC - double crochet
HDC - half double crochet
SC - single crochet
SC2tog - single crochet two together

good luck!
<3 awaLL

Tuesday, March 4, 2014

#cooking: stuffed bell peppers

i tried a recipe similar to this, and well it failed... i think the steps or the length of time the peppers should have cooked in the Crockpot was very incorrect... anywho, i decided that i would like to make a good stuffed bell pepper like my friends have made me before - so i tried a new recipe found on good ol' Pinterest.

ingredients:
* 3 bell peppers (cut the tops off and take the seeds out - keep the tops)
* 1 tbsp olive oil
* medium onion - chopped
* 1 large clove of garlic - chopped
* 1lb of ground beef
* 2 tbsp parsley
* 1/2 tsp salt
* 1/4 tsp pepper
* pinch of red pepper flakes (i've used chili flakes and added to taste for level of spice)
* 1.5c white rice
* 1 cup of tomato sauce
* water

#step 1: pre-heat the oven at 350 degrees F

#step 2: heat the bottom of the bell peppers in microwave with water in a dish for 2-3 minutes. let cool/dry on paper towel during remainder of prep.
why? this helps make the bell peppers tender prior to baking

#step 3: cook rice during prep and set aside

#step 4: heat olive oil, add onion, garlic and chopped up tops of the bell peppers. cook until soft

#step 5: add beef, parsley, salt, pepper, and pepper/chili flakes. cook until meat is browned and crumbled

#step 6: add rice and tomato sauce and stir well.

#step 7: arrange peppers in baking dish and add water to the bottom until about 1/3" thick.
Photo Cred: www.prlog.org

#step 8: stuff peppers with rice and meat mixture until filing forms a slight dome above the edge of the pepper

#step 9: bake for 25-30 minutes or until the peppers are tender and the rice/meat mixture is browning on top.

bon appetit!
<3 awaLL